Our Location
304 North Cardinal St.
Dorchester Center, MA 02124

304 North Cardinal St.
Dorchester Center, MA 02124
Refresh your file cabinet with a splash of color by opting for a bold paint choice. Use a vibrant hue that complements your workspace, giving new life to an otherwise dull piece. For a fun twist, consider a gradient effect by blending two colors, or add a chalkboard paint section for jotting down quick notes.
Enhance functionality with decorative handles. Swap out standard knobs with eclectic options that reflect your personality. Vintage drawer pulls or sleek modern designs can transform the cabinet’s appearance and make opening drawers a delightful experience.
Add a personal touch by applying removable wallpaper or vinyl decals. Choose patterns that resonate with your style–florals, geometric shapes, or even inspirational quotes. This easy-to-change option allows you to update the look whenever you feel like a change.
Transform the top surface into a display area. Use felt or cork squares to create a bulletin board that allows for pinned reminders and important documents. This adds both style and utility, keeping your workspace organized and visually appealing.
Incorporate organizational trays or bins inside the drawers. Choose colorful dividers to categorize paperwork and office supplies. This not only simplifies finding what you need but also provides an attractive interior that matches the exterior makeover.
Select a paint specifically designed for metal surfaces. Look for options labeled as metal or multi-surface paints. These formulations provide better adhesion and durability, ensuring a long-lasting finish.
Consider the finish you want. Satin or semi-gloss finishes are great choices as they offer a slight sheen and are easier to clean. Matte finishes can look modern but might attract dirt more easily.
Check the color palette. Neutrals like white, gray, and black offer versatility, while brighter shades can add personality. Test a small swatch on a less visible area of the cabinet to see how the color looks in your space.
Don’t forget about the environment. Water-based paints emit fewer fumes and are less harmful. Look for low-VOC options to keep the air quality safe during your project.
| Type of Paint | Finish | Best For |
|---|---|---|
| Metal Paint | Satin | Durability & Cleanability |
| Multi-Surface Paint | Semi-Gloss | Versatility |
| Water-Based Paint | Matte | Low Odor & Environmentally Friendly |
Finally, gather the right tools: high-quality brushes or a paint sprayer for a smooth finish. Prepare the cabinet by cleaning and sanding the surface, which helps the paint adhere better. Follow the manufacturer’s instructions for drying times between coats.
Choose a fun pattern or color of contact paper that matches your aesthetic. Clean the surface of your file cabinet thoroughly before application. Measure and cut the contact paper slightly larger than the area you wish to cover. This allows for precise placement and adjustments.
Peel the backing to start applying the contact paper, aligning it carefully with the edges of the cabinet. Slowly press down to avoid air bubbles. Use a flat tool, like a credit card, to smooth out any imperfections as you go. If air bubbles emerge, poke them gently with a pin and push the air out towards the edges.
For a layered effect, consider using different patterns for each drawer. Pair bold geometric designs with softer textures to create a visually appealing contrast. Mixing matte and glossy finishes adds depth and interest.
Don’t shy away from using contact paper on drawer fronts or inside the cabinet for an unexpected pop. Change the look easily by swapping out designs seasonally. This flexibility allows your file cabinet to evolve alongside your style.
Finally, seal the edges with a clear sealant to protect against wear. This small step enhances durability and keeps your cabinet looking fresh and attractive. Explore various styles while enhancing functionality, making your file cabinet a focal point in your workspace.
Choose unique knobs and handles to instantly transform your file cabinet. Opt for vintage ceramic knobs or sleek metallic ones that reflect your style. A pop of color from bright acrylic pulls can add a cheerful touch to an otherwise mundane piece.
Consider swapping standard hinges for decorative ones. Options like ornate or brushed finishes can enhance the overall look. Pair your new handles with matching drawer liners to complement the hardware and create a cohesive design.
If you’re feeling adventurous, add a stencil or engraving to the hardware. Personalize knobs with initials or patterns that resonate with you. This small detail can make a significant impact and turn ordinary hardware into a conversation starter.
Magnetic or removable hardware is another option for those who like variety. Enjoy the flexibility to change your cabinet’s look based on seasons or moods without much effort. Decorative magnets or clip-on accents provide a fun and dynamic approach.
Shop local artisan markets for handcrafted pieces that tell a story. Supporting local craftspeople not only enhances your cabinet’s aesthetic but also adds a meaningful element. Each unique piece could bring a touch of character and charm.
Lastly, don’t overlook the use of chalkboard or label hardware. Create charm while also providing functionality. Chalkboard labels can be changed as your needs evolve, keeping your cabinet both stylish and practical.
Choose stencils that resonate with your style–floral patterns, geometric shapes, or inspirational quotes. Ensure they are made from durable materials to withstand multiple uses. Position the stencil securely on the cabinet surface using painter’s tape to prevent movement during application. This ensures clean, crisp designs.
Select high-quality spray paint or acrylics that adhere well to your cabinet’s finish. Start with a base coat if needed, allowing it to dry completely before applying the stencil. For the stenciling process, use a sponge or a brush to dab paint onto the stencil rather than brushing it on. This technique minimizes paint seeping under the edges, resulting in sharper lines.
Mix and match different stencils to create a curated look. Layering designs can add depth and interest. For example, combine a large geometric stencil with smaller floral accents in the corners. After stenciling, apply a clear sealant to protect your design and enhance the finish. This step extends the longevity of your custom decor.
Experiment with color combinations. Use contrasting colors for a bold effect or shades of the same hue for a more subtle approach. Consider creating a gradient effect by blending colors directly on the stencil for added sophistication. Define each area clearly to prevent a chaotic appearance.
Lastly, don’t hesitate to personalize your cabinet. Adding your initials or a meaningful date can give your project a unique flair. With a little creativity and the right tools, stencils can transform an ordinary file cabinet into a personalized statement piece for your workspace.
Use cardboard or lightweight wood to create dividers tailored to your cabinet’s interior. Measure the dimensions of your cabinet shelves to ensure a snug fit. Cut the material into strips, typically 1-3 inches wide, giving you flexibility in spacing.
For added functionality, label each divider. Use adhesive labels or a label maker to categorize items like documents, supplies, or personal items. This small step enhances organization and makes finding things quick and easy.
Consider adjustable dividers if you anticipate changing contents frequently. Use a tension rod or a similar mechanism to allow for easy repositioning of your dividers based on your needs.
Use clear containers within your sections to further organize smaller items. This prevents clutter and keeps everything within reach. Aim for a cohesive style by choosing containers that align with your overall design theme.
Use bright colors and creative designs to turn outdated files into striking wall art. Begin by selecting files with interesting textures or colors. Cut them into shapes or patterns that resonate with your aesthetic. Consider geometric designs, abstract forms, or nature-inspired figures.
Frame these creations in inexpensive frames or mount them directly on canvas panels for a modern touch. Arrange them in clusters on your wall for an eye-catching display that adds character to any room.
Create a collage using various old files. First, gather files with different colors and patterns. Layer these papers on a canvas or a thick paper substrate. Apply a coat of decoupage medium to seal the arrangement–this also gives it a polished finish. You can add embellishments like stickers or stencils for more depth.
Try making large-scale art by using oversized versions of files. Scan and enlarge colorful documents. Print them on canvas or heavyweight paper and hang them as statement pieces. This technique easily transforms simple files into impressive art without requiring advanced artistic skills.
Experiment with various display methods, such as a DIY string display where you clip the artwork onto a string with mini clothespins. This casual approach allows for easy rotation of new pieces, keeping your space fresh.
Turning old files into art is not only sustainable but also transforms dull documentation into conversation starters.
A boring filing cabinet can be given a new look with a simple DIY project using chalk paint, peel and stick wallpaper, and new hardware. Start by cleaning the old metal surface and applying a coat of primer to ensure the paint adheres properly. Once dry, apply the first coat of chalk paint and let dry before adding additional layers for full coverage. Peel and stick wallpaper can be used on the drawer fronts to create a modern design. Finish by attaching new hardware for a polished touch. Let dry overnight before placing it in the home office for a fresh, stylish update.
To give your filing cabinet a new look, begin by sanding down any rust and cleaning the metal surface thoroughly. Apply a coat of Rustoleum metal primer to prevent further rusting and create a smooth base for painting. Once dry, use chalk paint to coat the metal file cabinet, applying a first coat evenly and allowing it to dry before adding a second layer. Let dry overnight to ensure durability. To add a creative touch, consider using stick wallpaper on the sides or drawers. Finish by replacing the old hardware with new handles for a refreshed, modern style.
An old metal filing cabinet can be repurposed into craft room storage with an easy DIY makeover. Start by removing any rust and applying a primer to prepare the surface. Paint the metal filing cabinet with a bright or pastel chalk paint for a fresh aesthetic. Let dry between coats to achieve a smooth finish. Attach pegboard to the side using screws to create extra storage for tools and supplies. Use peel and stick wallpaper on drawer fronts for added style. Adding new hardware will complete the transformation, turning the thrift store find into a stylish and functional piece of furniture.
A thrift shop or thrift store is a great place to find an old metal filing cabinet at an affordable price. Home Depot and similar home improvement stores sometimes offer discounted or clearance options for a new file cabinet, but second-hand stores often have unique, budget-friendly choices. When selecting a metal file cabinet, check for rust and ensure the drawers open smoothly. Even if the surface is worn, a metal filing cabinet makeover using chalk paint, Rustoleum primer, and stick wallpaper can easily give it a fresh, updated look. Simple DIY projects like this turn second-hand furniture into stylish home office pieces.
A metal cabinet can be upgraded with a painted metal finish using a few simple steps. Begin by cleaning the surface thoroughly to remove any dust or grease. If the cabinet has rust spots, sand them down before applying a primer to ensure proper adhesion. Once the primer is dry, use spray paint or chalk paint to achieve the desired look, applying thin, even coats and allowing each coat to dry completely. Let the final layer dry overnight before reassembling or placing items inside. Adding new hardware or decorative elements can further enhance the transformation. For additional inspiration, explore similar posts featuring creative metal cabinet makeovers.
Touch device users can explore by touch when looking for painted metal furniture ideas by using interactive design apps or scrolling through image galleries on home improvement websites. Many platforms provide zoom and swipe features, making it easy to view close-up details of a painted metal cabinet or similar projects. Pinterest and DIY blogs often offer similar posts with step-by-step guides and before-and-after images. When selecting a tutorial, look for detailed instructions on sanding, priming, and painting to ensure a smooth and professional finish on the metal cabinet.
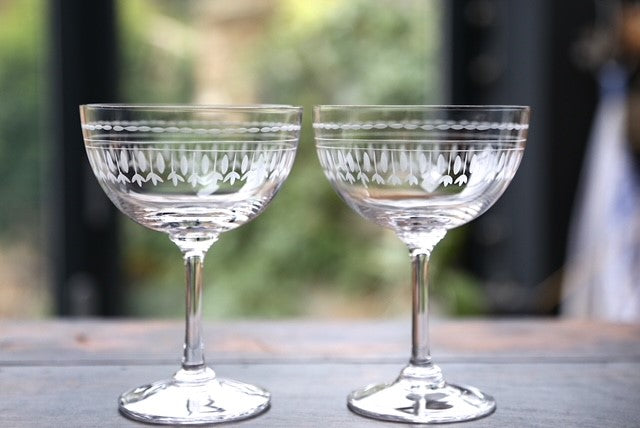
When it comes to serving champagne, the vessel of choice for many connoisseurs is the vintage champagne coupe. With its […]
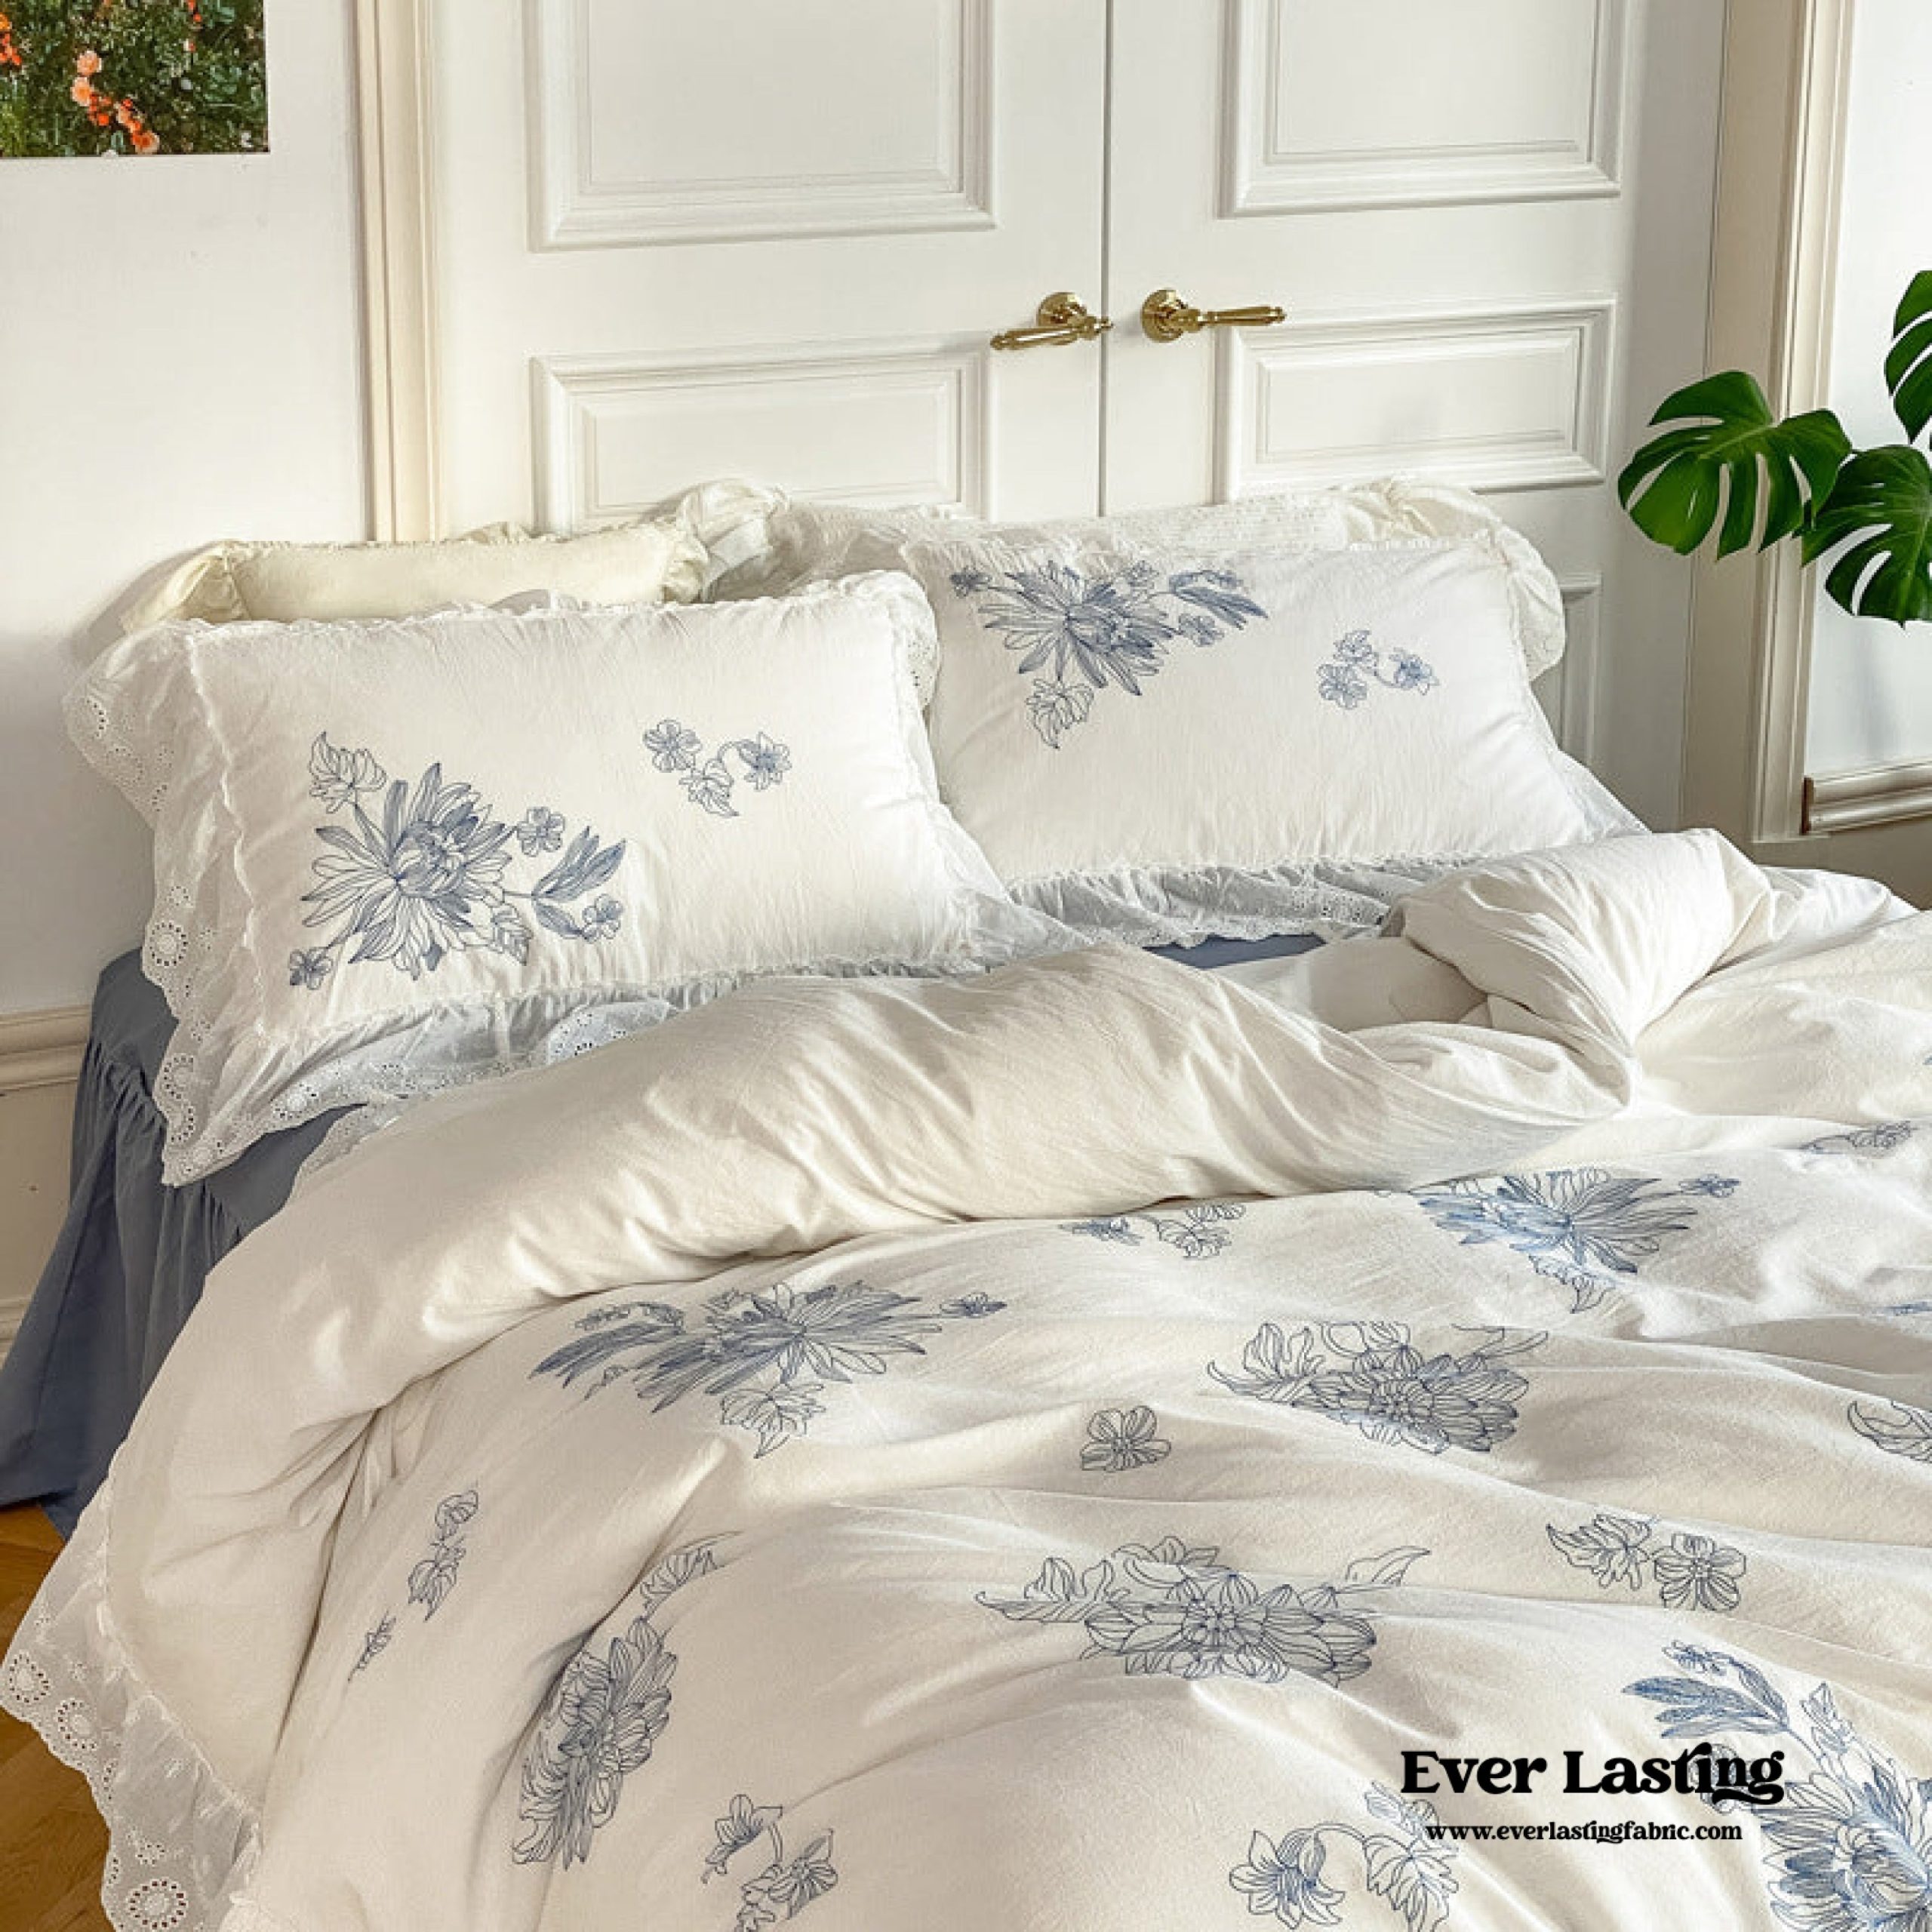
Transform your bedroom into a luxurious oasis with our French White Lace Ruffle Bedding Bundle. Crafted with meticulous attention to […]
Transforming the atmosphere of your home beyond the ordinary realm of mainstream décor is an art that requires a unique […]
Step into a realm where craftsmanship and creativity intertwine, taking shape in a truly captivating art form. Delve into the […]